Looking to play YouTube Music on HomePod? This guide will walk you through a few simple methods, including streaming via Siri, using AirPlay, and downloading YouTube Music on your computer with a third-party tool for offline listening.
The HomePod is Apple’s smart speaker, offering great sound quality and smart home control through voice commands. It works seamlessly with Apple devices like iPhone, iPad, and Apple Music, making it easy to stream music and set up multi-room audio. It also supports other streaming services like Deezer, Pandora, iHeartRadio, TuneIn, and now YouTube Music. With YouTube Music integration, you can use voice commands to play your favorite tracks. If you have a HomePod or HomePod Mini, keep reading to learn how to enjoy YouTube Music on your HomePod speaker.
CONTENTS
Part 1. How to Connect YouTube Music Directly to HomePod
With YouTube Music now integrated directly with Apple’s HomePod, you can easily play YouTube Music on your HomePod using Siri. To get started, you’ll need a YouTube Music or YouTube Premium account and the latest version of the YouTube Music app. Here’s how to set it up:
Steps to Connect YouTube Music to HomePod:
Step 1. Open the YouTube Music app on your iPhone or iPad and tap your profile icon in the top-right corner.
Step 2. Go to Settings > Connected Apps > Connect with HomePod, and then tap Continue.
Tip: If the “Connected Apps” option isn’t visible, try closing and reopening the app.
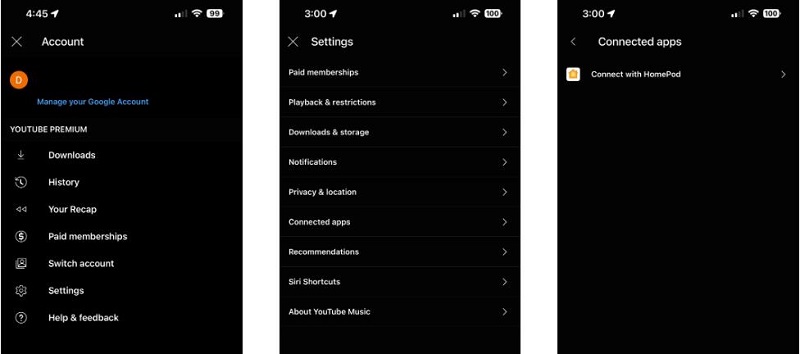
Step 3. On the next screen, tap Use in Home, then tap Done to finish the setup.
Now, you’re all set to stream music directly from YouTube Music on your HomePod. Just say, “Hey Siri, play songs by [artist] on YouTube Music.”
Make YouTube Music Your Default Music Service:
To skip saying “on YouTube Music” in your Siri commands:
Step 1. Open the Home app on your iPhone or iPad.
Step 2. Tap the three-dot menu in the top corner, select Home Settings, and tap your username under the “People” section.
Step 3. Choose Default Service and select YouTube Music.
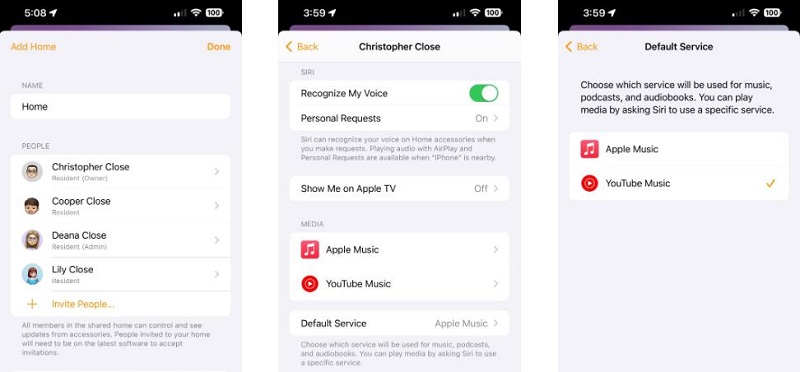
With YouTube Music set as the default, your HomePod will automatically play music from your YouTube account without needing additional prompts in Siri commands. Enjoy seamless streaming!
Part 2. How to Stream YouTube Music on HomePod Using AirPlay
You can also play YouTube Music on your HomePod using AirPlay to stream music from your iPhone, iPad, or Mac. To do this, make sure the YouTube Music app is installed on your device and that both your HomePod and device are connected to the same Wi-Fi network. Follow these steps:
How to Use AirPlay to Play YouTube Music on HomePod:
Step 1. Open the YouTube Music app on your iPhone, iPad, or Mac and choose the song or playlist you want to play.
Step 2. Locate the AirPlay icon (a rectangle with a triangle below) near the playback controls.
Step 3. Tap the AirPlay icon and select your HomePod from the list of available devices.

Step 4. The music will start playing through your HomePod. You can control playback from your device as usual.
That’s it! Your HomePod will now act as the speaker for your YouTube Music, giving you a simple way to enjoy your favorite songs.
Part 3. How to Play YouTube Music on HomePod without an iOS Device [Best]
The methods above allow you to play YouTube Music on a HomePod, but they have some limitations. The first option is only available for YouTube Music Premium subscribers, while free users can use AirPlay but will encounter audio ads. Additionally, both methods require Apple devices, and not everyone wants to pay for a Premium subscription.
If you’re looking for a way to play YouTube Music on HomePod without using an iOS device, there’s an alternative solution. Since Apple Music is the default music service on HomePod, you can transfer YouTube Music songs to your Apple Music library.
4kFinder YouTube Music Converter is a powerful tool that lets both Free and Premium users download and convert YouTube Music tracks, albums, or playlists into popular formats like MP3, M4A, AAC, FLAC, WAV, or AIFF, while retaining lossless audio quality and ID3 tag metadata. With this, you can easily transfer your favorite songs to any device or add them to your Apple Music library for seamless playback on your HomePod with no Premium subscription required. Additionally, 4kFinder features a built-in YouTube Music web player, allowing you to search, browse, download, and play music all in one place without needing any additional apps.
Key Features of 4kFinder YouTube Music Converter
- Download tracks, playlist, albums from YouTube Music.
- Support YouTube Music Free and Premium account.
- Convert YouTube Music to MP3, M4A, AAC, FLAC, WAV, AIFF.
- Keep original audio quality and ID3 tags after conversion.
- 10x faster conversion speed in batches.
- Play YouTube Music on HomePod and other devices.
- Compatible with Windows and Mac.
Guide: How to Download YouTube Music for HomePod
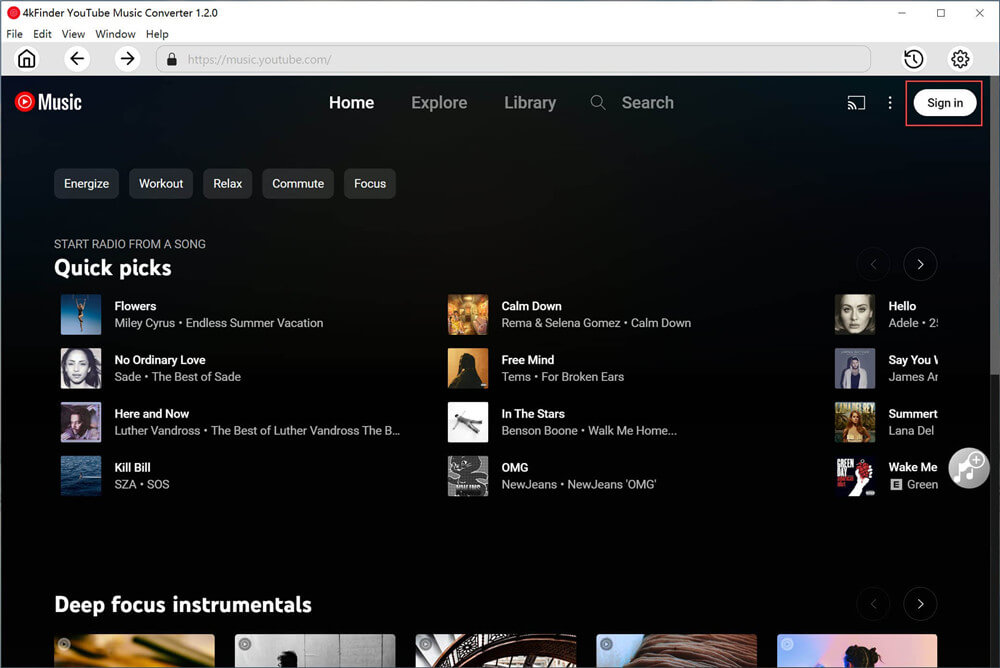
Step 1. Log In to Your YouTube Music Account
Download and install the latest version of 4kFinder YouTube Music Converter. Open the program and log in to your YouTube Music account, whether it’s Free or Premium.
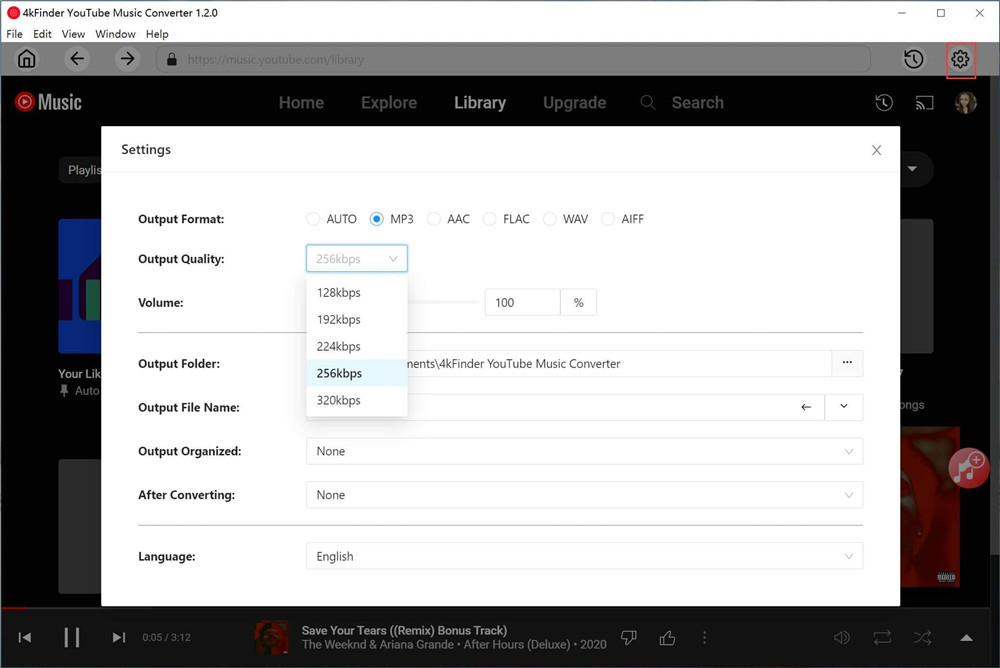
Step 2. Configure Output Settings
Click the gear icon in the upper corner to access the settings menu. Here, you can customize the output format (e.g., MP3, M4A), quality, output path, and language options.
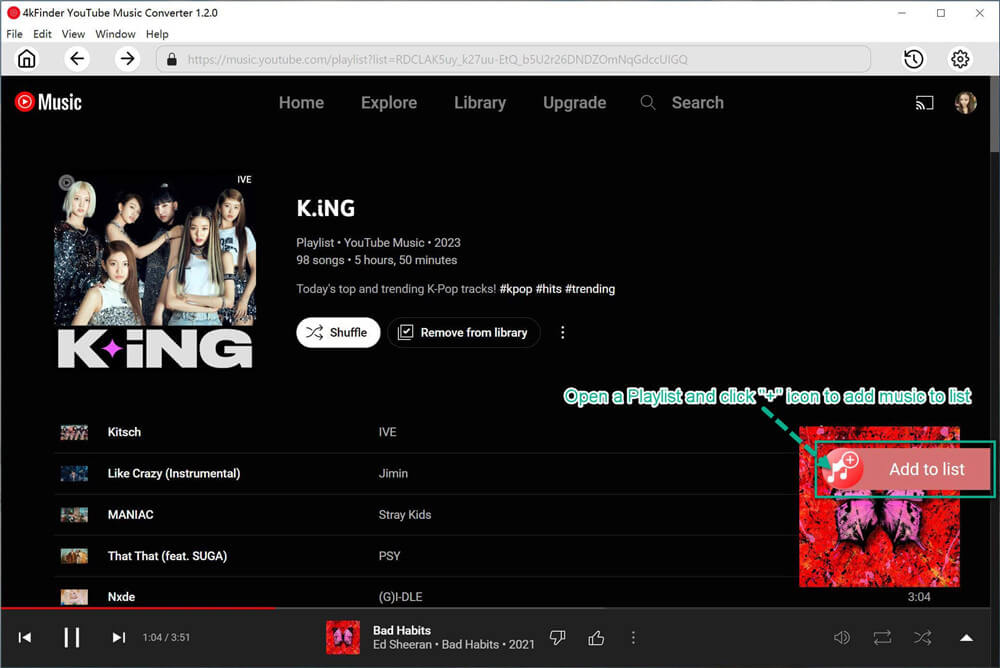
Step 3. Add Music to the Conversion List
Use the built-in YouTube Music web player to search for songs, albums, or playlists. Select the content you want and click the red “+” icon to add it to the conversion list.
Step 4. Choose Songs for Conversion
By default, all songs in the selected album or playlist will appear in the conversion panel. Deselect any tracks you don’t want to convert.
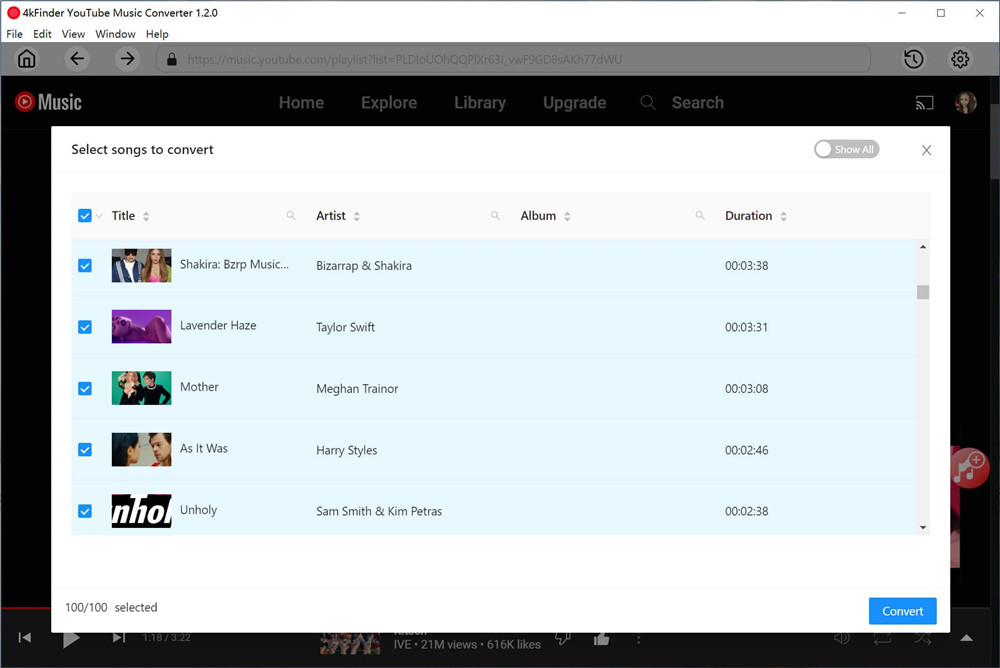
Step 5. Start Converting YouTube Music Songs
Click the “Convert” button to download and convert the selected tracks from YouTube Music to your chosen format (e.g., MP3, M4A).
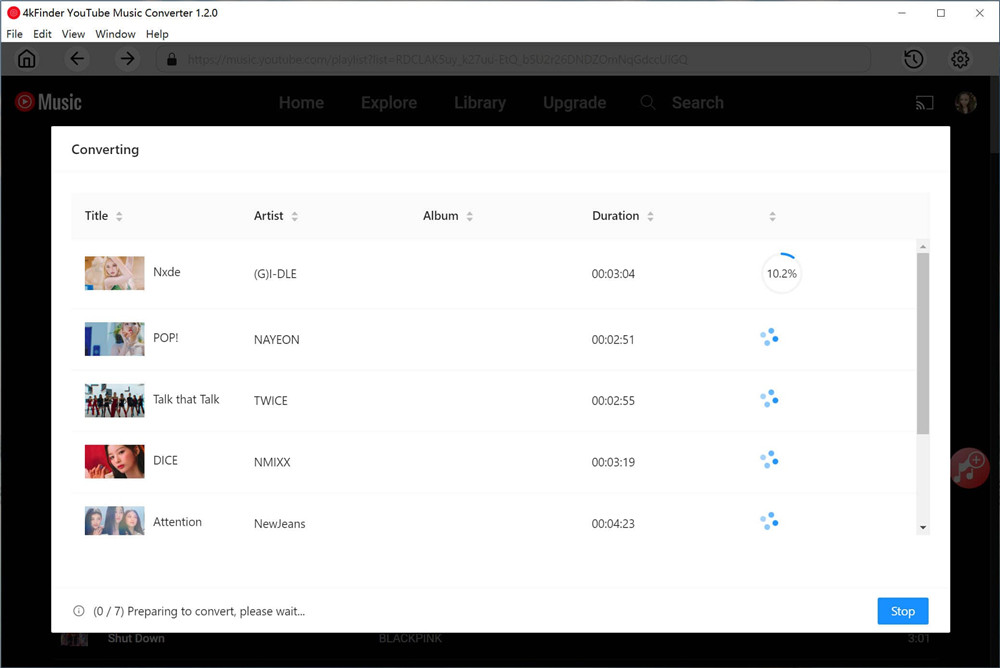
Step 6. View Converted Songs
Once the conversion is complete, click the clock icon (History) to access your converted songs. You can organize them by date, artist, or album.
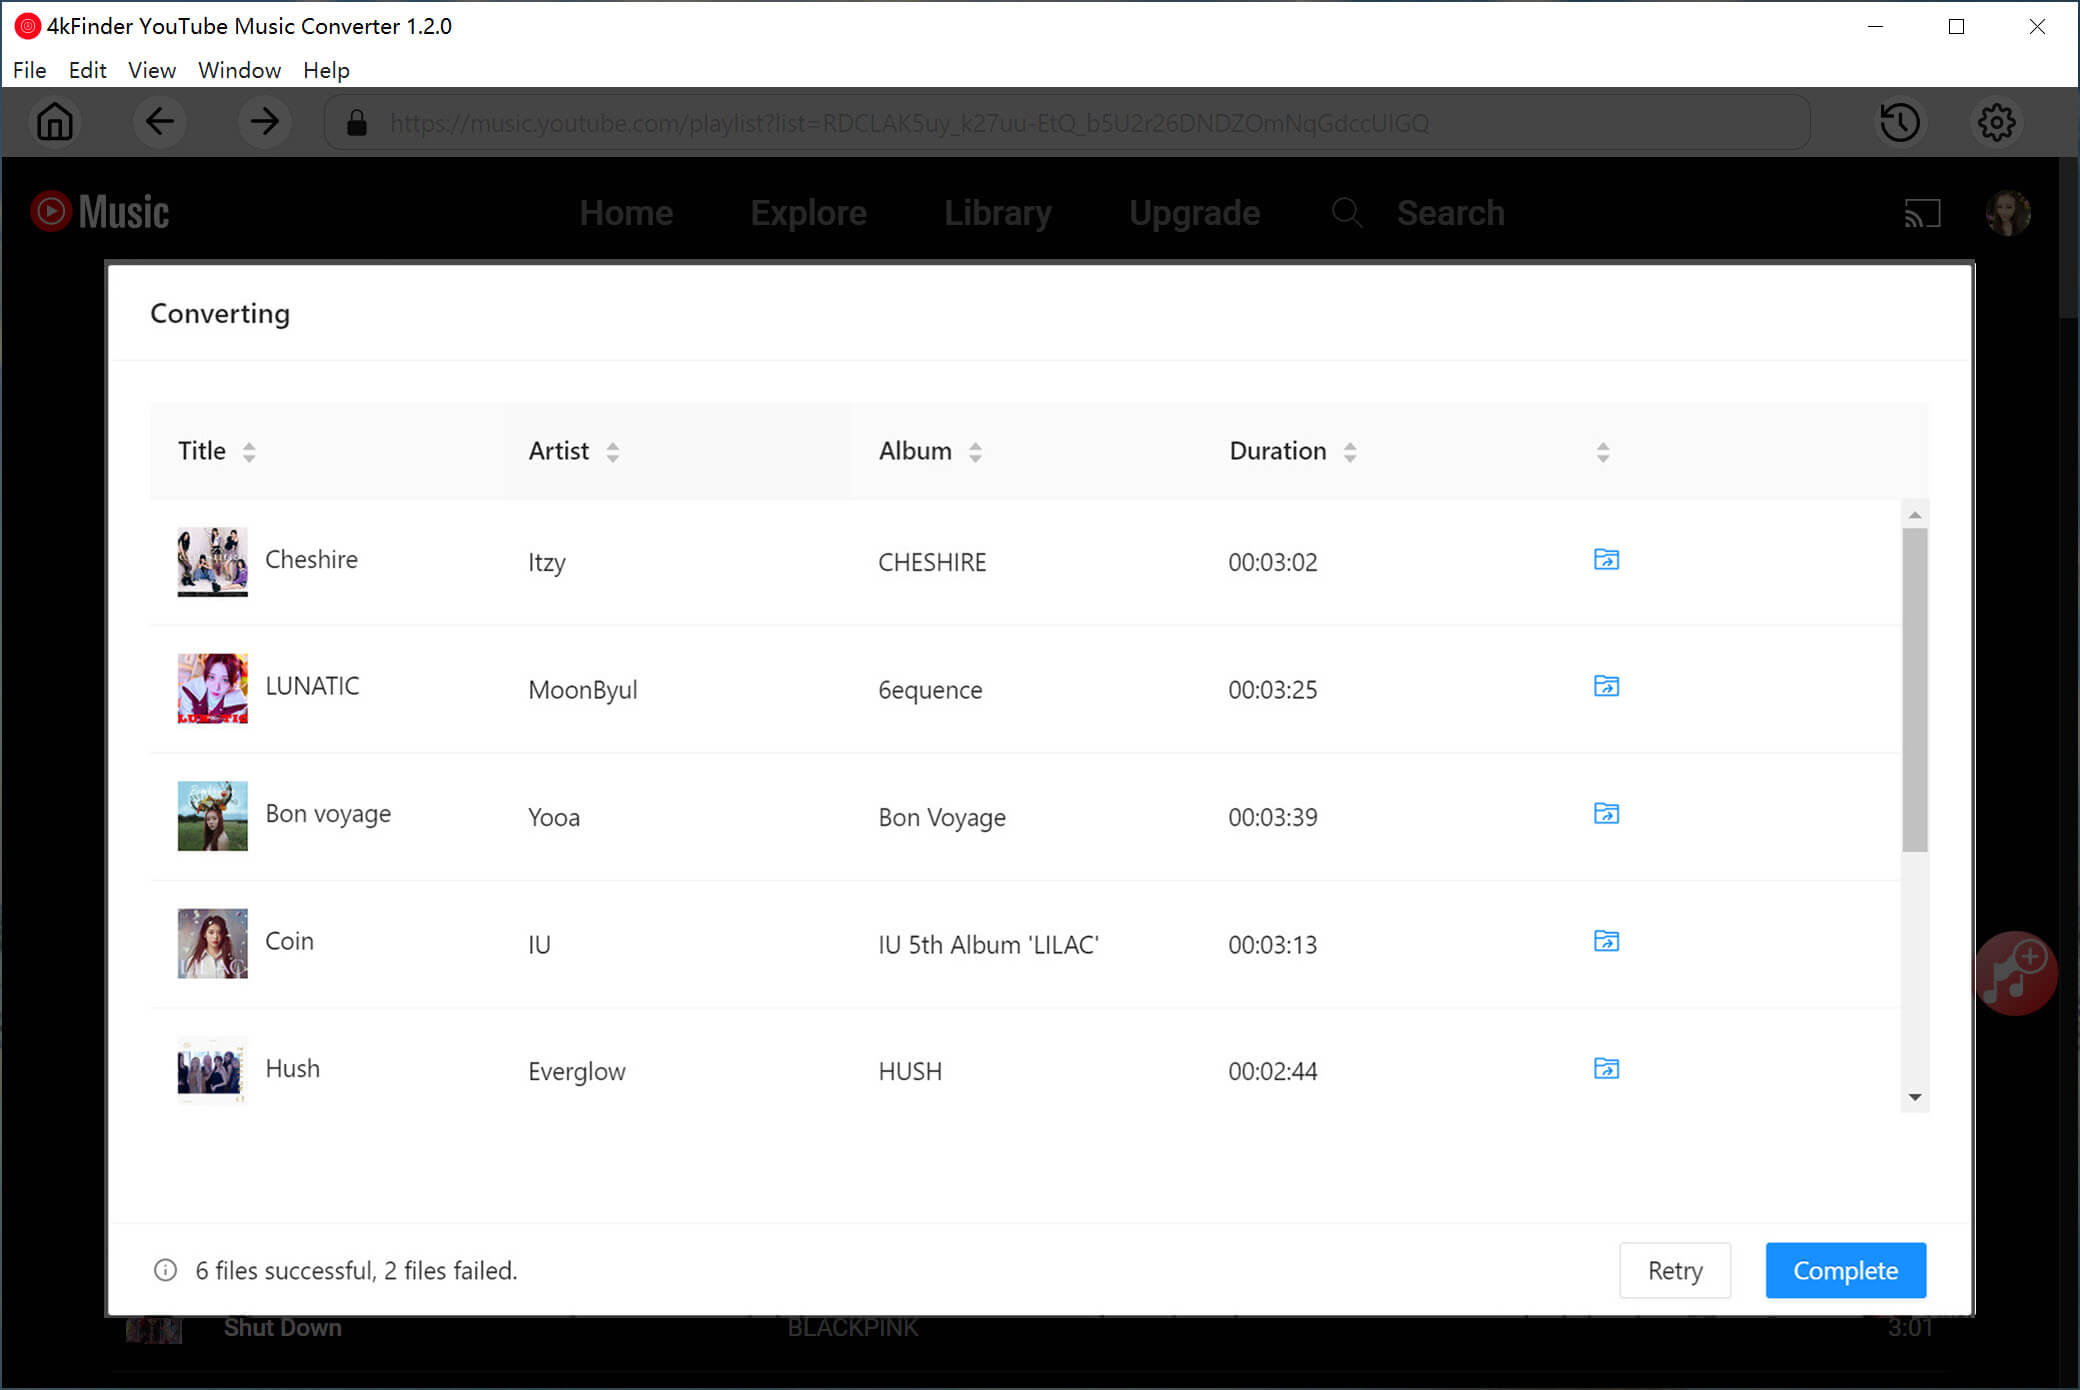
Step 7. Transfer Songs to Apple Music or iTunes
Locate the downloaded files by clicking “Converted” and then the folder icon. Open Apple Music or iTunes, go to File > Add to Library, and upload the tracks. Once added, you can play YouTube Music on your HomePod without needing an iOS device.
Conclusion
With these options, you can easily play your favorite YouTube Music tracks on your HomePod. You can stream directly with YouTube Music integration or use AirPlay to play from your iPhone, iPad, or Mac.
If you want to play YouTube Music on your HomePod without using an iOS device, 4kFinder YouTube Music Converter is a great choice. It lets you download songs and playlists to your local storage, so you can enjoy them on your HomePod even without a Premium subscription. So ready to get started? Download 4kFinder and try it now!
 Download Netflix videos to MP4 or MKV format in 1080P Full HD resolution.